Featured

Introduction To Frame Works

Introduction

JavaScript is a well known web development tool for a developer. Java Scripts supports both front end and back end of web application. While most of the languages are Object Oriented language but JavaScript is an Object Based Language. In this Blog we are going to discuss about the most trending JavaScript frameworks used in the industry.

What Is Application Framework

Application framework is a skeleton or a complete tool which reduces the developer task in building an application. These frameworks are used in both front end and as well as back end.

When we talk about JavaScript Framework, Angular, NodeJS, React, Bower and Grunt can be considered as the most popular frameworks in the industry among a ton of frameworks.

Object Based Principles

Object Based are similar kind of practices like OOP concepts. Here we can categorize these principles into main three groups

  • Single Responsibility
  • Open-close
  • Liskov substitution
  • Interface segregation
  • Dependency inversion

It is always good to work according to best practices, above principles lead us to best approach of web development. In this introduction section I am going to discuss about the principles that should be used in any kind of frameworks.

Single Responsibility Principle : A class or function should have only one job assigned. This means that each class or function must be loosely coupled, it make developer easy to make a change in future.

Open-Close Principle : “Object or entities should be open for extension but closed for modification”. This definition determines the abstraction used in oop concepts. If he have class that implements a function to calculate something and return. And thing that if we have another same kind of calculation but with different logic then as a best practice we have to depend on a abstract function which will extend the same function in different place.

Liskov Substitution Principle : This principle describes the exact same thing in Inheritance. There must be a real connection between base class and sub class. Child class must override the the functions in the base class and meaning of the function shouldn’t be changed.

Interface Segregation Principles : Developer should implement only the functions that are really used by client. Have to group the functions into different interface according to client.

Dependency Inversion Principle : When the development is doing in layered approach higher level modules mus not be depend on lower level layers, but they should depend on abstraction.

Guidance to Approach the Solution

Think through the Problem : It is good practice to think about the solution before starting to code because when you start to develop without thinking the solution you can be lost among codes. Most importantly don’t afraid to clear your doubts. It can be domain or programming. You have to be clear on what you are developing.

Divide and Conquer : Divide the complex problems into smaller ones, then you can easily understand what need to be done next.

KISS : “Keep It Simple and Stupid”, keep you solution simple don’t make it complex.

Learn from mistakes : Always take a mistake as an opportunity to learn the correct thing. Everyone make mistakes but you have to overcome that.

Reason why Software Exists : Keep in mind why you are building the software. You have to keep a picture of the application.

You won’t be the end user : End users are mostly common people who are not developers, don’t assume that user will understand technical things. Keep the system more user friendly as you can.

Guidance To Implement the Solution

YAGNI – You aren’t gonna need it : If some code phrases or functions are currently not useful, stop developing that things and put effort in useful function.

DRY – Don’t repeat yourself : Always make function that can be reusable and reuse the code every time it’s possible.

DRITW – Don’t reinvent the wheel : Most of the time when you are enhancing an application solution for you problem can be already exists in the program. Don’t re write those codes again and use the same solution for you problem.

Kaizen – Leave it better then you found it : When you are fixing a bug or enhancing an existing application make it better than you received. Always go through the solutions and determine everything is work fine.

Debugging is harder than code : When you are working for a organization, you colleagues have to enhance the solution you build. There for you have to make the code more readable.

Those are the common guidance that a developer must be aware. It always good to follow the principles and guidance as industry expects a good employee who can work with collaboration with other mates.

HTTP MESSAGES

In this Blog I am going write about HTTP Messages. HTTP Messages represent how data exchanged between server and client. There are two main message types in this section, They are requests and responses.

The simple description is, client’s request triggers an action in the server and returns the response for the particular request.

HTTP messages consist of textual information encoded in ASCII, which spread over several lines. Those messages were sent publicly across the link in HTTP/1.1, and earlier versions of the protocol. In HTTP/2, the message that used to be human-readable has been split into HTTP frames, enabling optimization and efficiency improvements.

HTTP request and response posses the same structure,

  1. Start Line – A single line with description of request to implement or its status.
  2. HTTP Header – Optional part, specify the request
  3. All meta-information
  4. Body – Optional part, contains data associate with request or response. Body size is initialized within the header.

HTTP Request

Start Line :

There are three main component of Start Line They are,
     1. HTTP method(Verb) : simply the verb like GET,PUT,POST or                noun like HEAD, OPTIONS.
     2. Request Target :  A URL or the path of the protocol,port and domain characterized by the request context.
     3. HTTP Version : Define structure of the remaining message and acting as a guide.

Headers

Single line followed by the colon(:) and the value and content depend on header. There are many request headers are available. As General Headers, Request Headers and Entity Headers.

Body

It’s the final part of request. Possess the data needed to trigger action in server. Usually not all requests don’t need this one but some needed. And further this id classified into two as single resource bodies and Multiple resource bodies

Babel in React

What is Babel ?

It’s a JavaScript compiler includes the ability of compiling JSX into JavaScript. It also able to do many powerful things.

Installing Babel

To use Babel we need to install Babel-Core which is the Babel’s npm module’s name. Here the command to install Babel will be differed from the way of installing react and react-dom. The command to install Babel is “npm install –save-dev babel-core. This code enables Babel to used in development mode.

And further we can use some other bundles to used along with Babel, such as babel-loader and babel-preset-react. In order to work with Babel we have to create a config file for Babel. So in the root directory create a file named .bebelrc and inside that config file {preset: [‘react’]} must me include. Now we are done with Babel installation and ready to go with Babel.

Babel makes developer work easier by compiling simple advanced code to regular JS codes

Classes In Babel

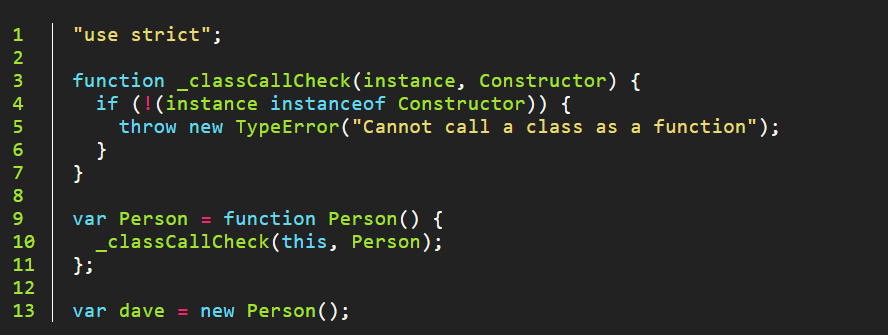
By Running a simple ES6 class code through Babel we can get a constructor function plus little decorations.

An ES6 class

Here we have Person function with standard constructor with safety checking.

Fat Arrows

It gives us the simple syntax for defining anonymous functions. For example we can write the following code

(x,y) => {return x + y}; and Babel will return us

(function (x, y) { return x + y; });

And if we want to call the function, we could do

(x, y) => {return x + y} (1,2); 
and Babel will return us the
(function (x, y) {
       return x + y;
})(1, 2);

So these are some examples on how Babel works and Babel can be used in advanced functions.

React Component Life Cycle

React Component

Components are the building blocks of any React app, and many of these would feature a typical React app. Simply put, a component is a JavaScript class or function that optionally accepts inputs i.e. properties(props) and returns a React element describing how a UI (User Interface) segment should appear Specially components are reusable, we don’t need to create a new component for just do the same thing. Usually React app is considered as tree of component.

Component LifeCycle

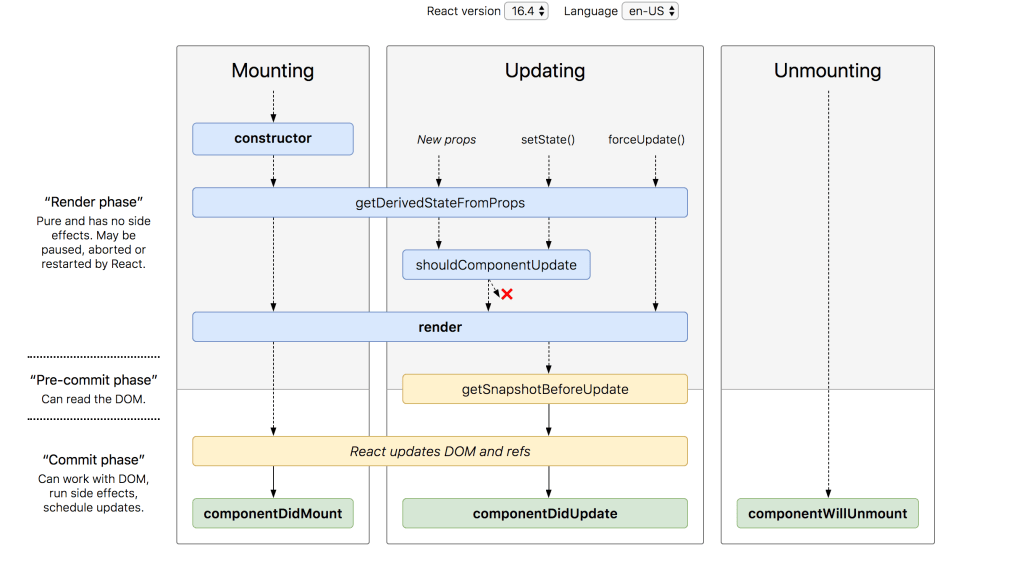
In React, each component has a lifecycle that you can control and modify during its three main phases. The three stages are: Montage, Upgrade, and Unmount.

Mounting

A component mounts when it is first created and inserted into DOM. For example: when it is rendered first. The main method that are available in this phase are,

  • constuctor()
  • render()
  • componentDidMount()

Render

Render is the most used and required method in a component. When we call render(), it examines this.state and this.props and return the specific output. If the element React has previously been made into a container, it will update it and only mutate the DOM as required to represent the new element React.

Component Will Mount

As the name clearly suggests, this function is invoked right before the part is installed on the DOM i.e. this function is invoked once before the function render (is first executed.)

Component Did Mount

Like the previous one this function is invoked right after the part is installed on the DOM i.e. this function is invoked once after the render) (function is first executed.

Updating

React is a JS library that lets you easily create Active web pages. The active web pages are now unique pages which function according to the user. For each user the website is behaving differently. In the Light Theme, User A may write some code in C while another User may write a Python code in the Dark Theme all at once. This act dynamically

getDerrivedState From Props And State

It exists just for one reason. It allows a part to update its internal state as a result of modifications to props. Fpr examples, such as recording the current direction of scrolling based on a change of offset prop, or loading external data defined by a source prop.

ShouldComponentUpdate

Each state or props update re-render the page by default, but this may not always be the desired result, it is sometimes preferred that the page will not be repainted while updating. The function shouldComponentUpdate() fulfills the requirement by letting React know whether the update will affect the performance of the component, or not.

componentWillUpdate

As the name clearly indicates, this function is invoked before returning the object, i.e. this function is invoked once before executing the render() function after State or Props update.

componentDidUpdate

Likewise, this function is invoked after rendering the object, i.e. this function is invoked once the render() function is executed after State or Props updates.

Unmounting

This is the final stage of the component’s lifeycle which is the process of unmounting the DOM component. Sole member of this step is the following function.

componentWillUnmount

This function is invoked before the component is ultimately unmounted from the DOM i.e. this function is invoked once before the component is deleted from the page and this signifies the end of the lifecycle.

So far we have discussed about the components and it’s key methods. Components are the most important concept of React. We can’t find a React app without components. So it’s important to know about react components.

Event Loop In Node.js

Node.js made JavaScript so valuable by adding most important features that are not available in JavaScript. Without node we can’t run JavaScript in our local pc. We have to install node.js first before we are starting to work with JavaScript but we can run JavaScript in some platforms without node.Node.js is a platform based on events. That means anything that happens in Node is the reaction to an event. A Node-passing transaction navigates a sequence of callbacks. Completely separated from the developer, all of these are handled by a library called libuv that offers an event loop method.

The event loop is the platform’s most confusing concept. So most of the developers are understanding Event Loop in wrong Term. So we need to clarify those misconception first.

1.Event loop Thread

There can only be one thread running JavaScript code which is the thread running the event loop. Callbacks processing (acknowledging that every user code is a callback running  in a Node.js application) is performed via the event loop.

2.Every Asynchronous calls are handled by a thread pool

By example, Libuv generates a thread pool of four threads to discharged asynchronous work. Operating systems of today already provide asynchronous interfaces for many I / O functions (such as AIO on Linux). Libuv will use those asynchronous interfaces wherever possible, avoiding thread pool use. The same holds true for third party subsystems such as databases. ⠀

3.Event Loop is Similar to stack or queue

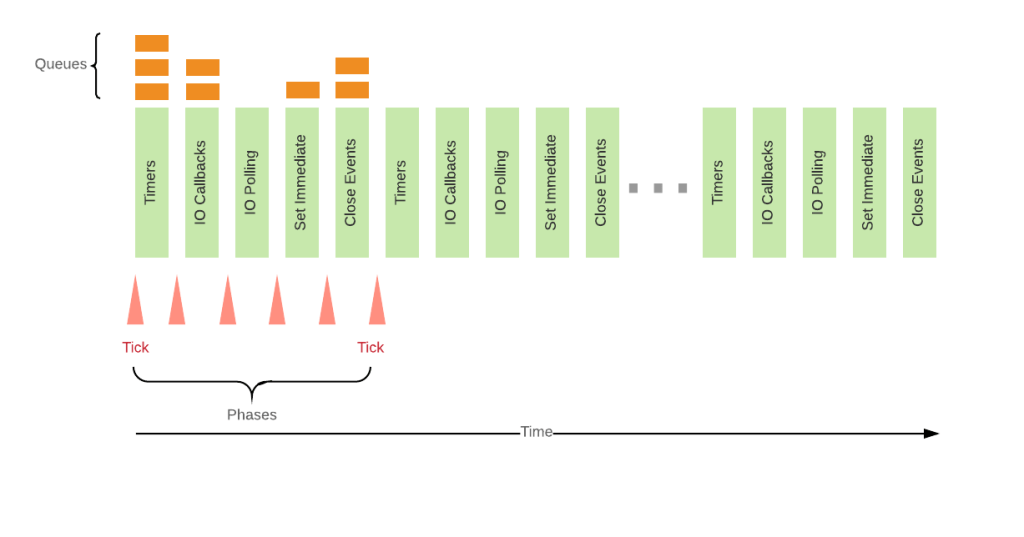
Although there are queue-like structures included, event loop doesn’t run via the stack process. As a process, the event loop is a series of phases with specific tasks that are executed in round-robin.

Phases of Event Loop Cycle

 Event Loop cycle consist of main phases in it’s process. To understand event loop better we need to be familiar with these phases.

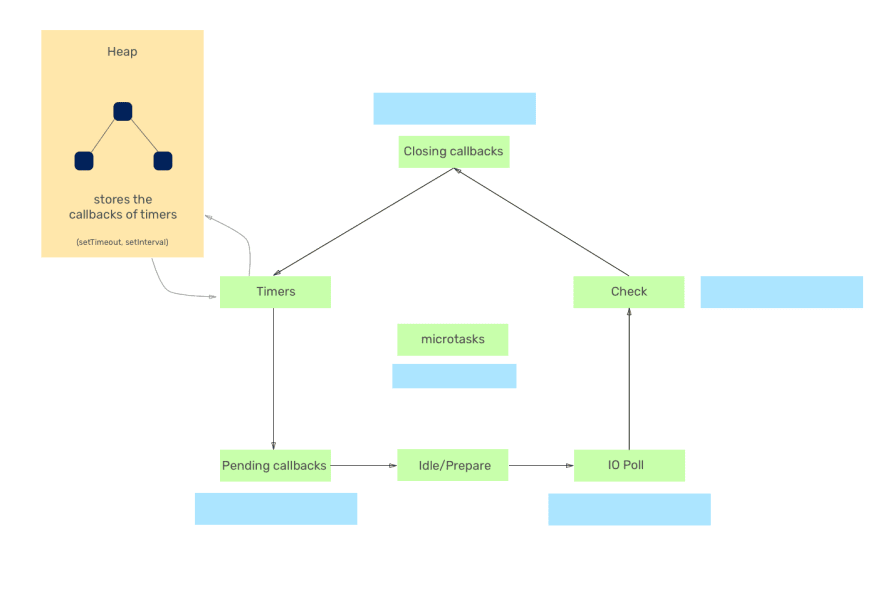
Timer

Timer callbacks of JavaScript(setTimeout, setInterval) are maintained in the heap memory till the callbacks expire. If the heap holds any expired timers, the event loop takes the related callbacks and begins operating those in the ascending order of their delay till the queue of timers is empty. The executing of the timer callbacks is regulated by the  the Poll phase.

Pending callbacks:

The event loop in this process performs any system-related callbacks available. For example, let’s say you’re creating a node server and some other process uses the port on which you want to run the method, node may throw an ECONNREFUSED error, some of* nix systems might want the callback to hold for execution because of some other tasks still operating in the system are performing.

Idle/Prepare:

Event Loop remain idle in this phase.

Poll

It’s this step that makes Node.js special. The event loop is watching out for new async I / O callbacks during this process. All callbacks are executed, except the callbacks setTimeout, setInterval, setImmediate, and closing. In this step, the event loop basically does two things:

1.When callbacks are already queued in the poll phase queue, then they will be executed until all callbacks are taken from the callback queue of the poll process.

2. If the queue contains no callbacks, the event loop remains in the poll process for some time. It may vary on some scenarios

Check/setImmediate

In this step, the event loop takes the callbacks from the queue of the Check process and begins one by one executing until the queue is empty. The event loop should come to this process when there are no more callbacks to be executed during the poll phase and the poll phase is idle. In this step the setImmediate callbacks are usually executed.

Closing callbacks

The event loop, in this step executes the callbacks associated with the closing events such as socket.on(‘close’, fn) or process.exit)

Microtasks

The microtasks include tasks such as setTimeout, setInterval, setImmediate, requestAnimationFrame, I / O, UI rendering, or other I / O callbacks. They have no such thing as event loop prioritization. The callbacks are performed according to phases of the event loop.

Above figure explains how event loop really works. It iterate again and again until there are no callbacks or other task to perform. Technically a Tick is known as the one iterate of event loop and tick duration is the time taken to complete it.

So we have clearly gone through the event loop phases. If we have a clear knowledge on how event loop works then I think you are ready for node.js

NOSQL

Database plays a prominent role in application, data means a lot for an enterprise application. Before emerging of NOSQL, Relational Schema used widely to maintain and process database in application. But developer faced lots of hard situations in Relational Schema.

Why NOSQL ?

  • NOSQL design to run on clusters efficiently than Relational Schema
  • It’s an open source and plenty of tools are available as open source
  • It is not using the relational model and most importantly it is schemaless.

There are number of NOSQL database that are ruling the industry. Key Value Pairs, Column Family Stores, Graph databases, Document Databases can be called as main categories of nosql databases according to their characters. Among them Riak,cassandra, mongoDB are some popular databases belong to above categories.

NoSQL got a big welcome by the industries and as well as Business leads, as it completely supports cloud databases there is no need to maintain a large db server by our own. Even a small scope business can also use an enterprise application developed by nosql databases. It save economy, speed of transactions and availability increases.

When we consider about disadvantage of NOSQL, most importantly it suits best for small scale systems. Also it is not well structured as relational schema. So when we have large complicated databases it is best to going for traditional relational databases.

Let’s discuss about MongoDB as an example for NOSQL,

MONGO DB

Mongo DB is a general purpose document based database platform that is used to build modern enterprise systems.

Mongo DB built around three core principles,

  1. The Document data Model
  2. A distributed system design
  3. Freedom to run anywhere

There are so many interesting facts about mongo DB, Mongo db uses its own methods of code and here after no worries about complicated SQL queries and most importantly mongoDB use collections instead of tables.All the data we are working with will be saved in particular collection we defined. And also it built on distributed architecture system which allow developers to easily scale or modify the database functionality. Mongo DB supports transaction in very little I/O cost, that’s why simple scale enterprise application are often developed using MongoDB.

So let’s see how to work with mongo DB,

Let’s get Started

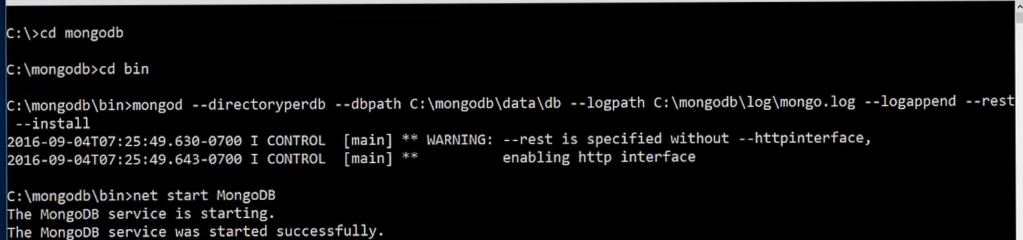
So first of all if you haven’t install MongoDB in your PC, go to the official mongoDB page and download version you love to work with. If you need to install all the data you are working with you can specifically change storage path as your wish. MongoDB have all the server based services and cloud based database. Here we are looking at how to work with MongoDB as a server. By the following way you can initially change your data saving path and MongoDB log path by giving the paths you want to use. Then to start MongoDB you have to run the net start MongoDB

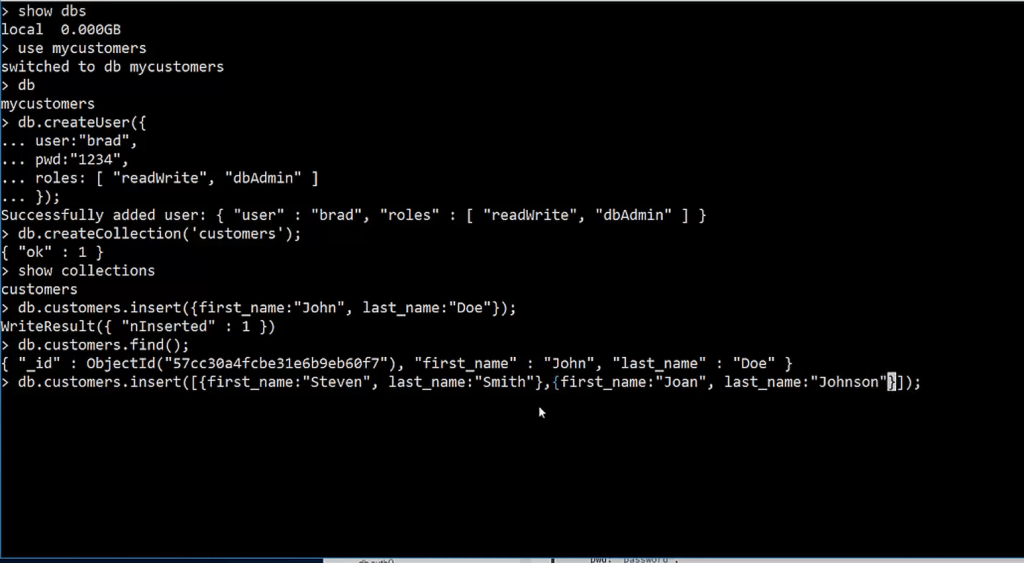
To get into MongoDB shell simply type mongo , now you are in the mongo shell it means you are ready to work.

As I mentioned before mongoDB doesn’t work like relational databases, it works with collection and save data as document based. So here when we work with mongo we won’t need to worry about SQl anymore. But we have to familiar with mongo shell commands to work with mongo db. The bellow picture illustrate couple of mongo functions used to view databse, create database, create collection, inser and update collection.

In here collection will automatically captures the alterations , no need to alter collections like tables

So this is how to working with mongoDB in the shell. It provides simple functions to deal with database. There are much more functions available in mongo to handle data. You can refer them in MongoDB official page

url : https://docs.mongodb.com/manual/reference/

Design a site like this with WordPress.com
Get started